Repairing PTZ IP camera
Our Floureon PTZ (pan tilt and zoom) external IP camera has shipped a bit of water. It lives on the south west corner of the building and gets battered by the strong south westerly prevailing winds we have here. Problem is the cost of the repair often exceeds the second hand market value of the camera. This is a common situation with a lot of today’s equipment. As Sod’s Law would have it, it is our most expensive IP camera, and the water it shipped was causing its lens to mist-up.
The camera is one of those PTZ things with HD and 18x optical zoom. It’s also located on the south west side of the property, so it really does the full brunt of the savage prevailing south-westerly winds we get here. The estimated cost of this repair was £100 – £200. Well, you can buy a new one for that if you shop around.
The Fix
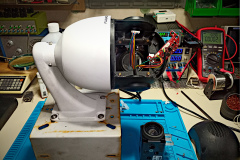
So I took it down, brought it into the workshop dismantled it, dried it out with hot air blower set to 100°C, cleaned the inside of the lens cover where the water was condensing. I then cleaned up the housing, coated the sealing gasket with silicone grease, reconnected all those PCB connectors, screwed it all back together – remembering to put a small amount of silicone grease on the screw threads so they come out easily next time! 🙂 I then went back out site and re-hung the thing, remembering of course to reconnect the PoE Ethernet connector before I finally screwed it back onto the wall.
Granted, it was a bit fiddly and it took me about an hour and a half. Scariest part TBH was climbing the steps to remove and reinstall it. I don’t like heights and I certainly don’t bounce as well as I used to! But the unit works an absolute treat and hasn’t cost me a bean. And better still, I took loads of photos so I know how to fix it next time it fills up with water!
General repair procedure for water damaged kit
Main problem cleaning-up water-damaged kit is often not the water per se. It’s the muck it carries-in with it. This can stain lenses and sensors and worse, bridge the copper tracks on printed circuit boards. My approach is generally some variant of the following…
- Gather as much documentation as possible. I have a Debian laptop, c/w Okular and access to our entire media library in my workshop, specifically for that purpose.
- Photograph the disassembly, especially the wires. I know from experience that I’m bound to break one off. So it’s quite handy to know where to solder it back on! I always have my ruggedised phone precisely for this – unless its the mobile that’s under repair, of course! 🙂
- Dismantle the kit and inspect carefully under magnifying lamp, especially printed circuit boards, and around multi-pin devices such as integrated circuits, connectors and flexible PCB’s.
- Use hot air soldering iron set to lowest temperature (100°C) to dry out any residual moisture. Held around 15-18cm away, the air temp is around 55°C. It’s is a dead handy bit of kit that has so many uses in the workshop – and they’re not expensive.
- Clean inside of any lens glass, optical sensors and displays with lens cleaner (usually ~33% isopropanol, ~33% white vinegar ~34% filtered distilled water).
- Re-lubricate moving parts. Bit of common sense required here with regard to type and amount, but generally less is best. Favourites include GT85, RS silicone grease or some combination of the two.
- Carefully clean the PCB(s), particularly between the tracks. Even very small deposits of crap can seriously affect electronic circuitry. I use a combination of 99.9% isopropanol in a 100ml spray bottle, c/w a clean Harris “pure bristle” 25mm paint brush.
- Place item under repair either in the airing cupboard (yes, we still have one of those) or on the top of a dehumidifier and allow to dry thoroughly prior to reassembly.
- Test, reassemble, reinstall – taking more snaps if needed.
So repairing the camera was a fairly simple fix
- I dried it out using the hot air blower that’s attached to my soldering station. I set it to minimum heat, 100°C.
- Cleaned the lens internals with aforementioned isopropanol | vinegar | distilled water mix.
- Cleaned all seals and coated them lightly with silicone grease.
- Reassembled and tested it. Then put it back on the wall.
Conclusion
Living on the south coast of England, the prevailing winds are south westerly, sometimes up to 20 metres per second, often accompanied by driving rain. This seems to bypass the seals on almost all supposedly “IP67” rated cameras. I mitigated the water ingression to some extent by applying some silicone grease to the seals prior to reassembly. Also found that if I tilt it downward 20°or so during a storm, it seems less prone to shipping water. But about every 2 years I still need to take the bloody thing off the wall, and work my way through the above.


