
Setting up a home studio
Editors note: this article is a few years old and there are updates and related posts that some readers may find helpful…
- 2016 – Converting inexpensive LED flood lights for use in the studio
- 2017 – Cheap but effective continuous studio lighting
- 2018 – Cheap and cheerful overhead camera mount for mirrorless camera
- 2019 – Safer modelling lights for Chinese flash head units
- 2020 – A surprisingly straightforward studio flash repair
- 2022 – Studio refurbishment
- 2024 – MM866 An affordable gobo projector
- 2024 – Affordable CCT spotlights for the studio
When we moved home a few years back, one of the most significant parts of our specification was a detached property with enough space for a reasonable sized home studio. We were looking for a place with a rectangular downstairs room, with no internal obstructions, roughly 6.0 metres x 4.0 metres, c/w a cloakroom on the same floor with toilet, basin hot+cold water and sufficient room for models to change reasonably comfortably. I based my studio size requirement thus…
- Absolute minimum 5.0 m x 3.0 m (Calculation basis: paper rolls are 2.72 metres wide; camera needs to be 2-3 metres from model; model needs to be around 1 metre from backdrop; backdrop will be offset from wall and I need to get behind camera).
- Absolute minimum ceiling height 2.35 m – standard height ceilings in many UK homes.
- Workable minimum approximately 6.0 m x 4.0 m (room for storage, peripherals, costumes, GNU/Linux media servers etc).
We had the added constraint that my wife wanted to be within walking distance of a mainline railway station. She worked in London at the time. Property also had to be detached because sometimes I work well into the night on various projects. Obviously it had to be affordable too. We studied the details of over 1000 potential properties, in a 200 km quest that stretched from Weymouth in the west to Hastings in the east. We narrowed this down to a shortlist of about 100 that we actually visited and measured.
After all that effort, we found just three that were potentially viable. One sold before we could sell our old place. Another needed a lot of work. Then there was this place, a probate sale, with plenty of room, a nice garden, close to the railway station, that “the boss” liked too! 🙂 Which is how we ended up here in Havant. 🙂
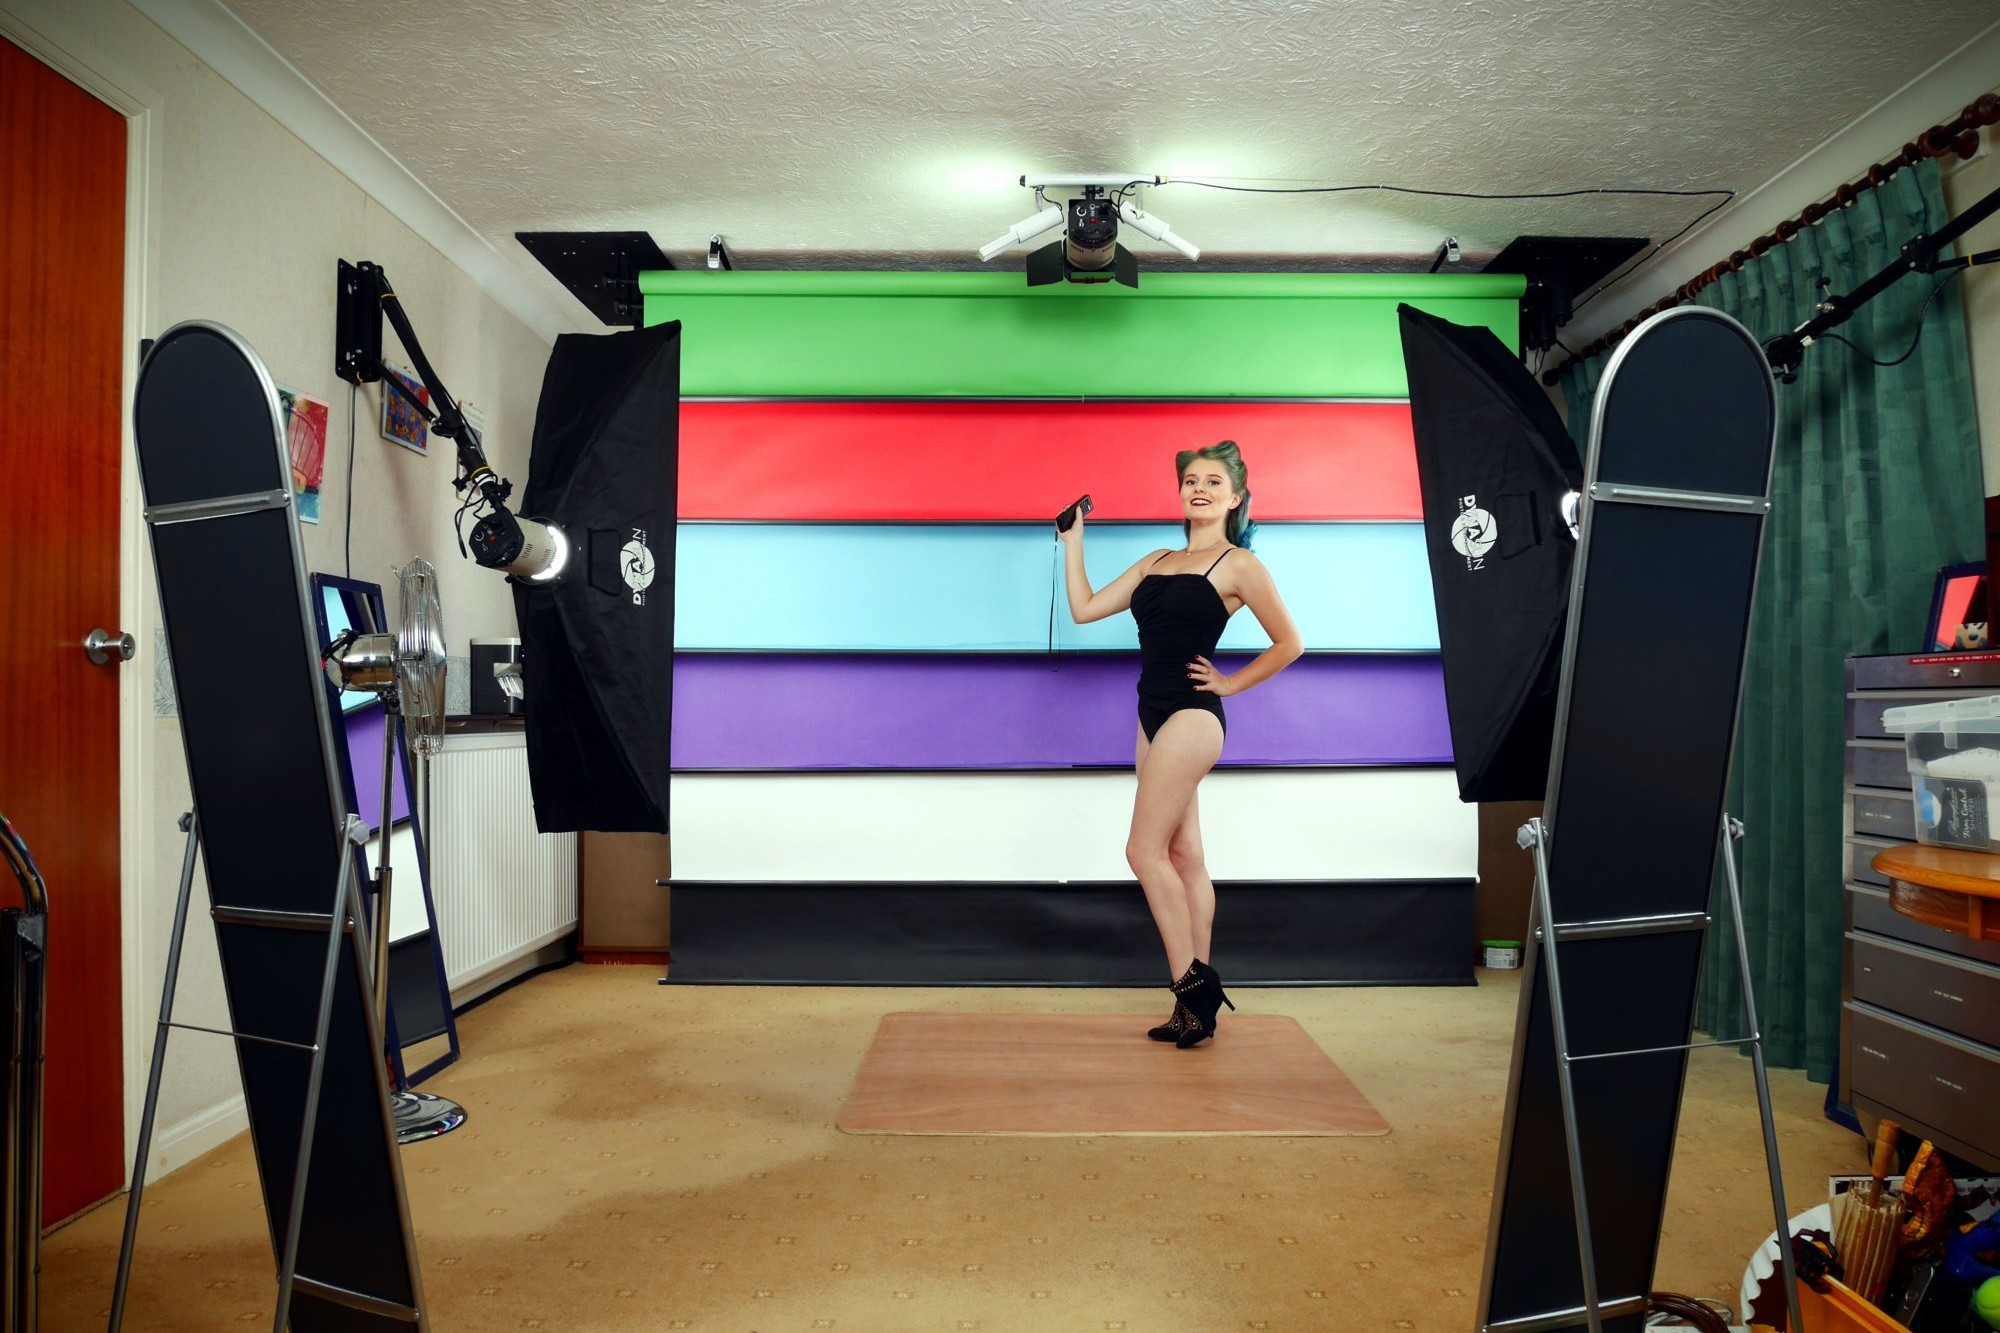
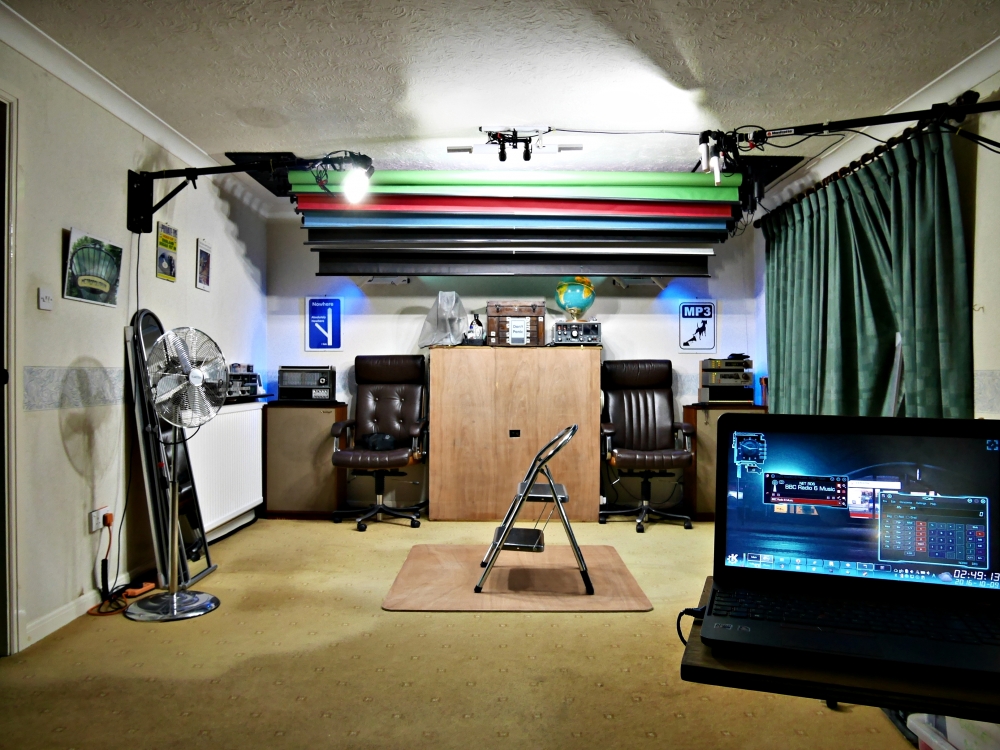
My Space
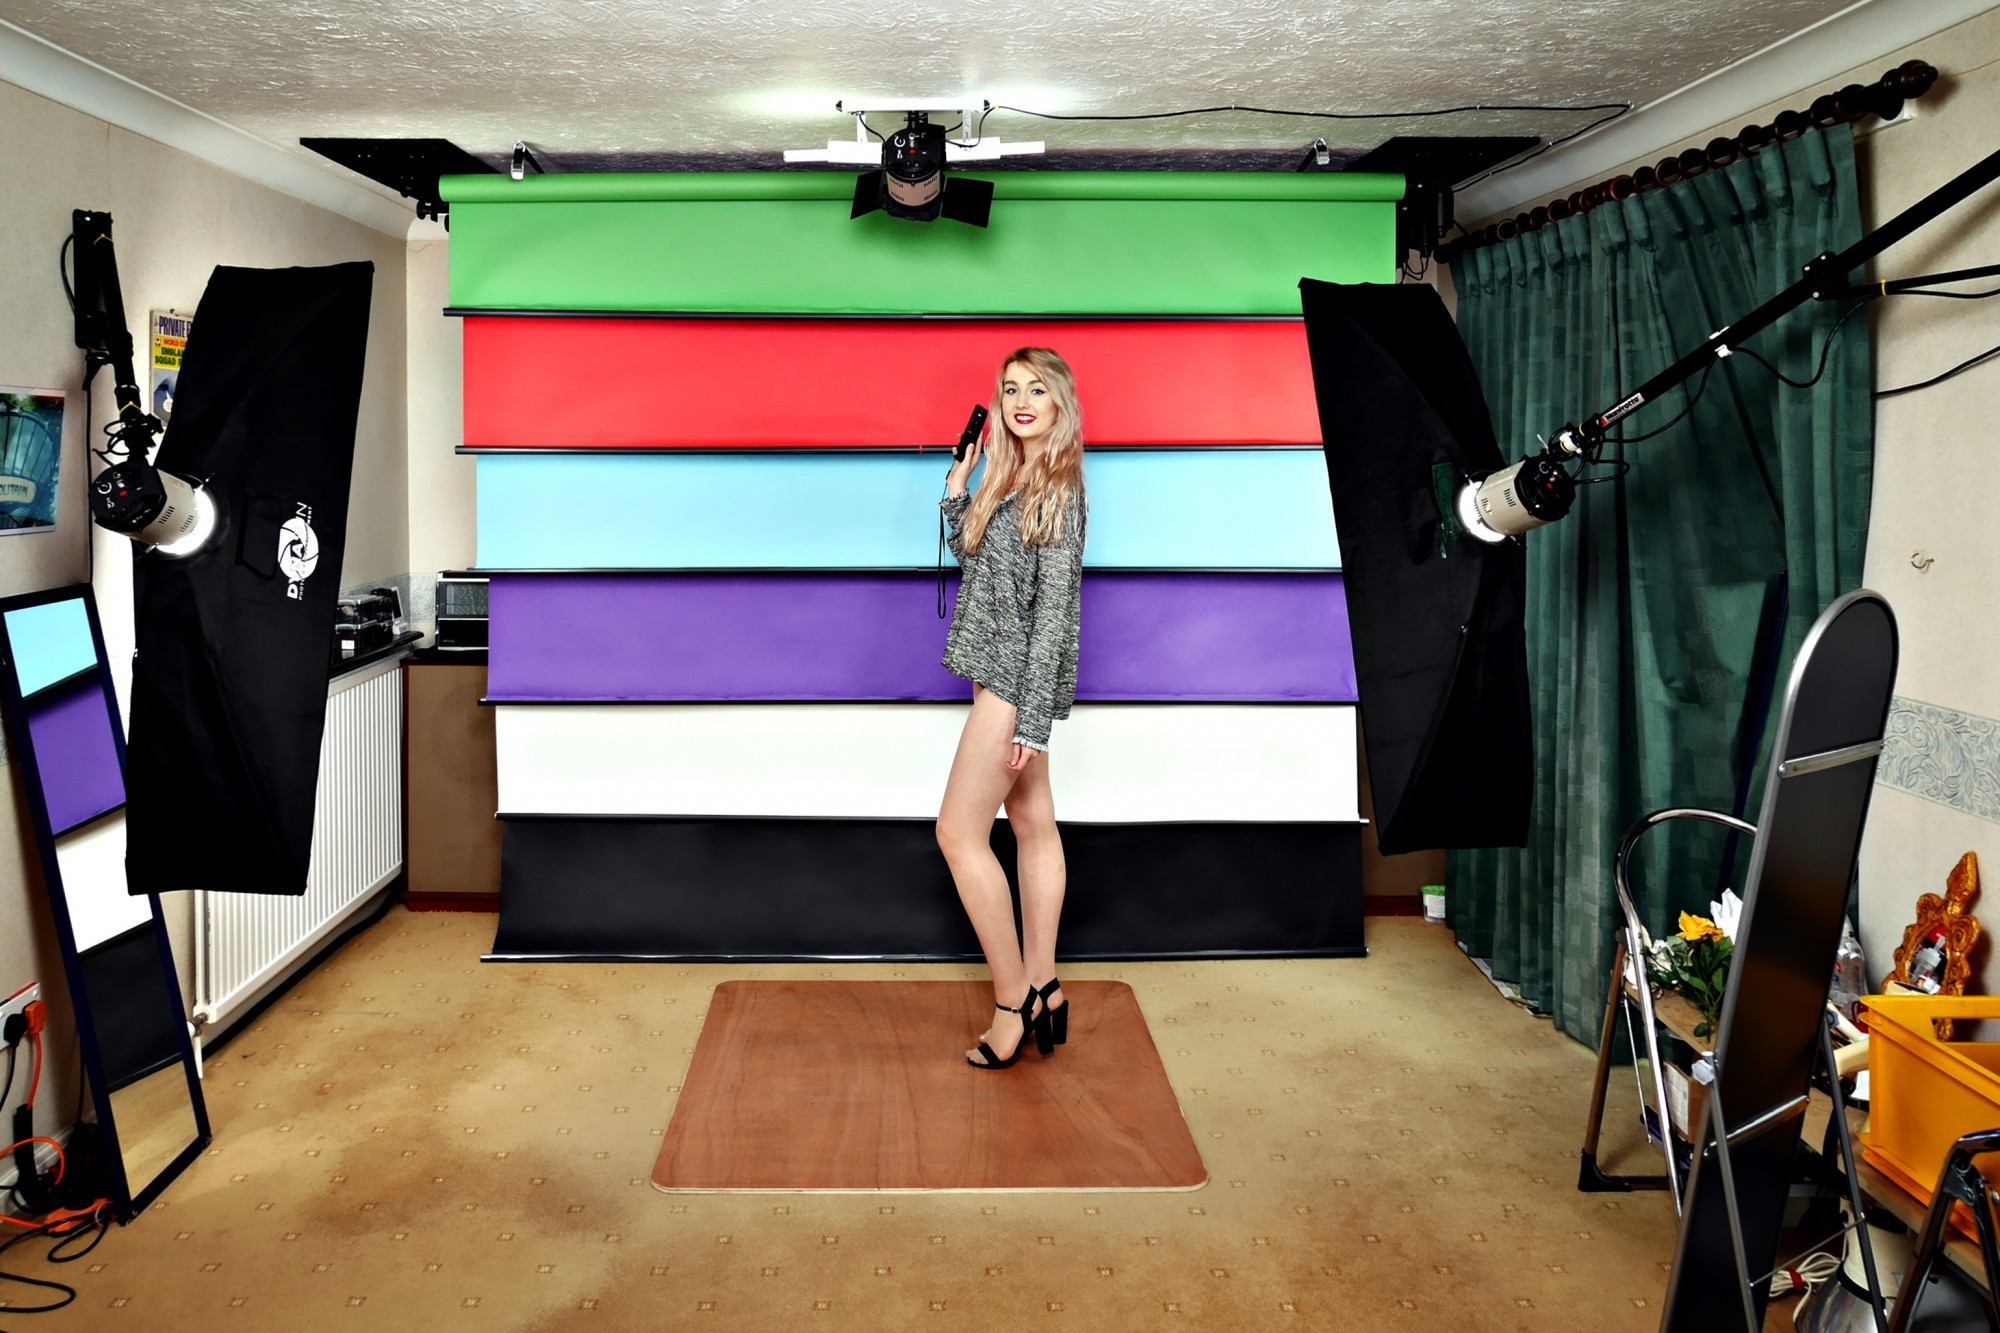
Here we have a heated, separately-accessible rectangular downstairs room, approximately 6.45 m x 3.89 m. Property also has a separate cloakroom on same floor level, measuring 1.6 m x 0.8 m. It’s important that one’s models have a comfortable private room for changing and doing their various ablutions. Additionally, there is a couple of square metres of easily accessible storage under the stairs, between the studio and the loo, that is ideal for storing costumes and props. Ceilings here are 2.37 m from top of floor coverings (2.40 m nominal). Ideally I’d like an extra metre in all three dimensions, but one can’t have everything! 🙂
Nevertheless, it soon became clear that I needed to make use of every square centimetre and deploy the available space as efficiently as possible. So I decided to deploy the following…
- Wall-mounted, pre-wired extensible booms, c/w 16 mm spigots and IEC 320 electrical connectors. This means I can quickly swap between studio flash and various forms of continuous daylight and RGB+CCT LED continuous lighting. Also means I seldom need floor stands. Which in turn means there is less clutter to trip over!
- Lots of 16 mm lighting spigots bolted to anything strong enough, e.g. on the ceiling spotlight fittings and the metal racking, located behind the photographer. These things are about a quid each from China, and they give me lots of studio-light mounting options that do not require separate stands.
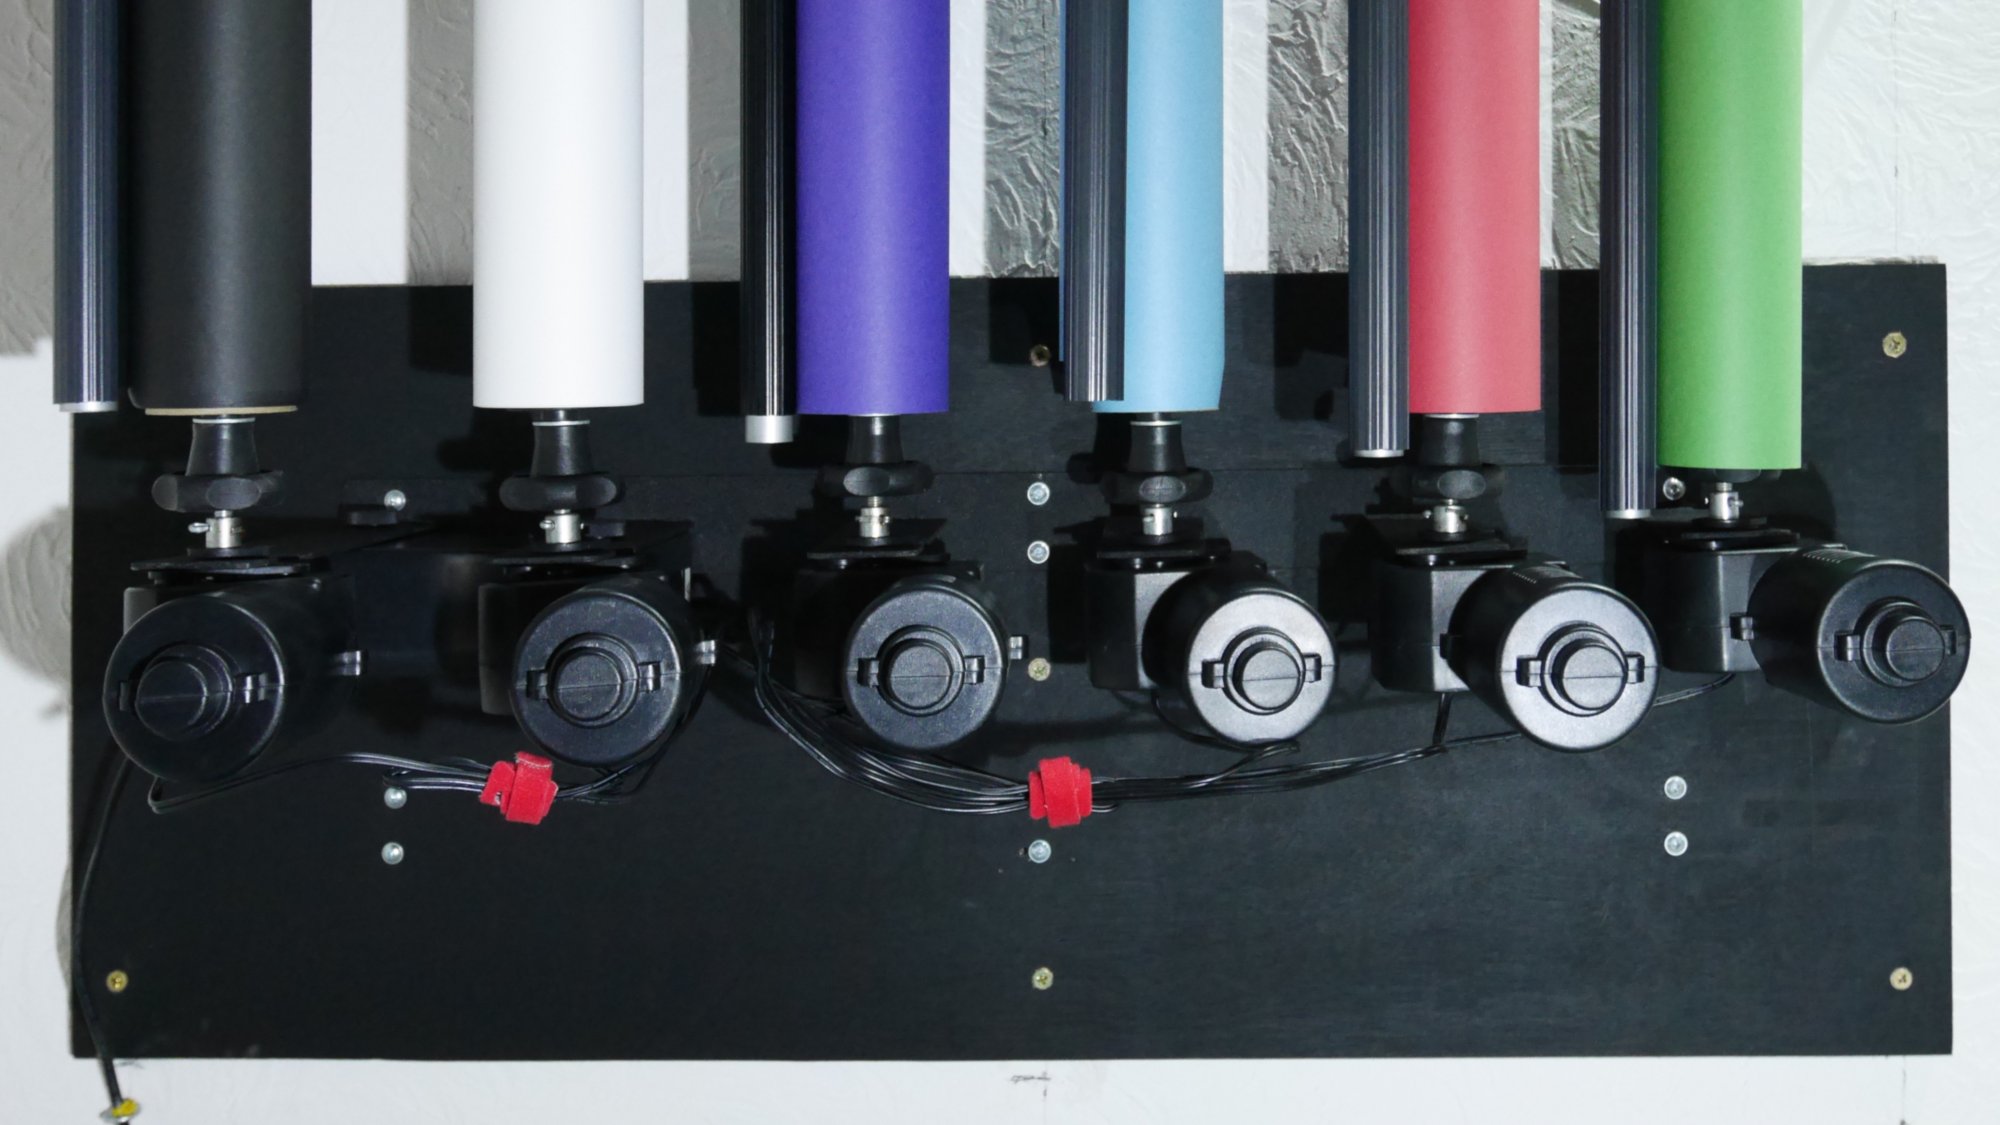
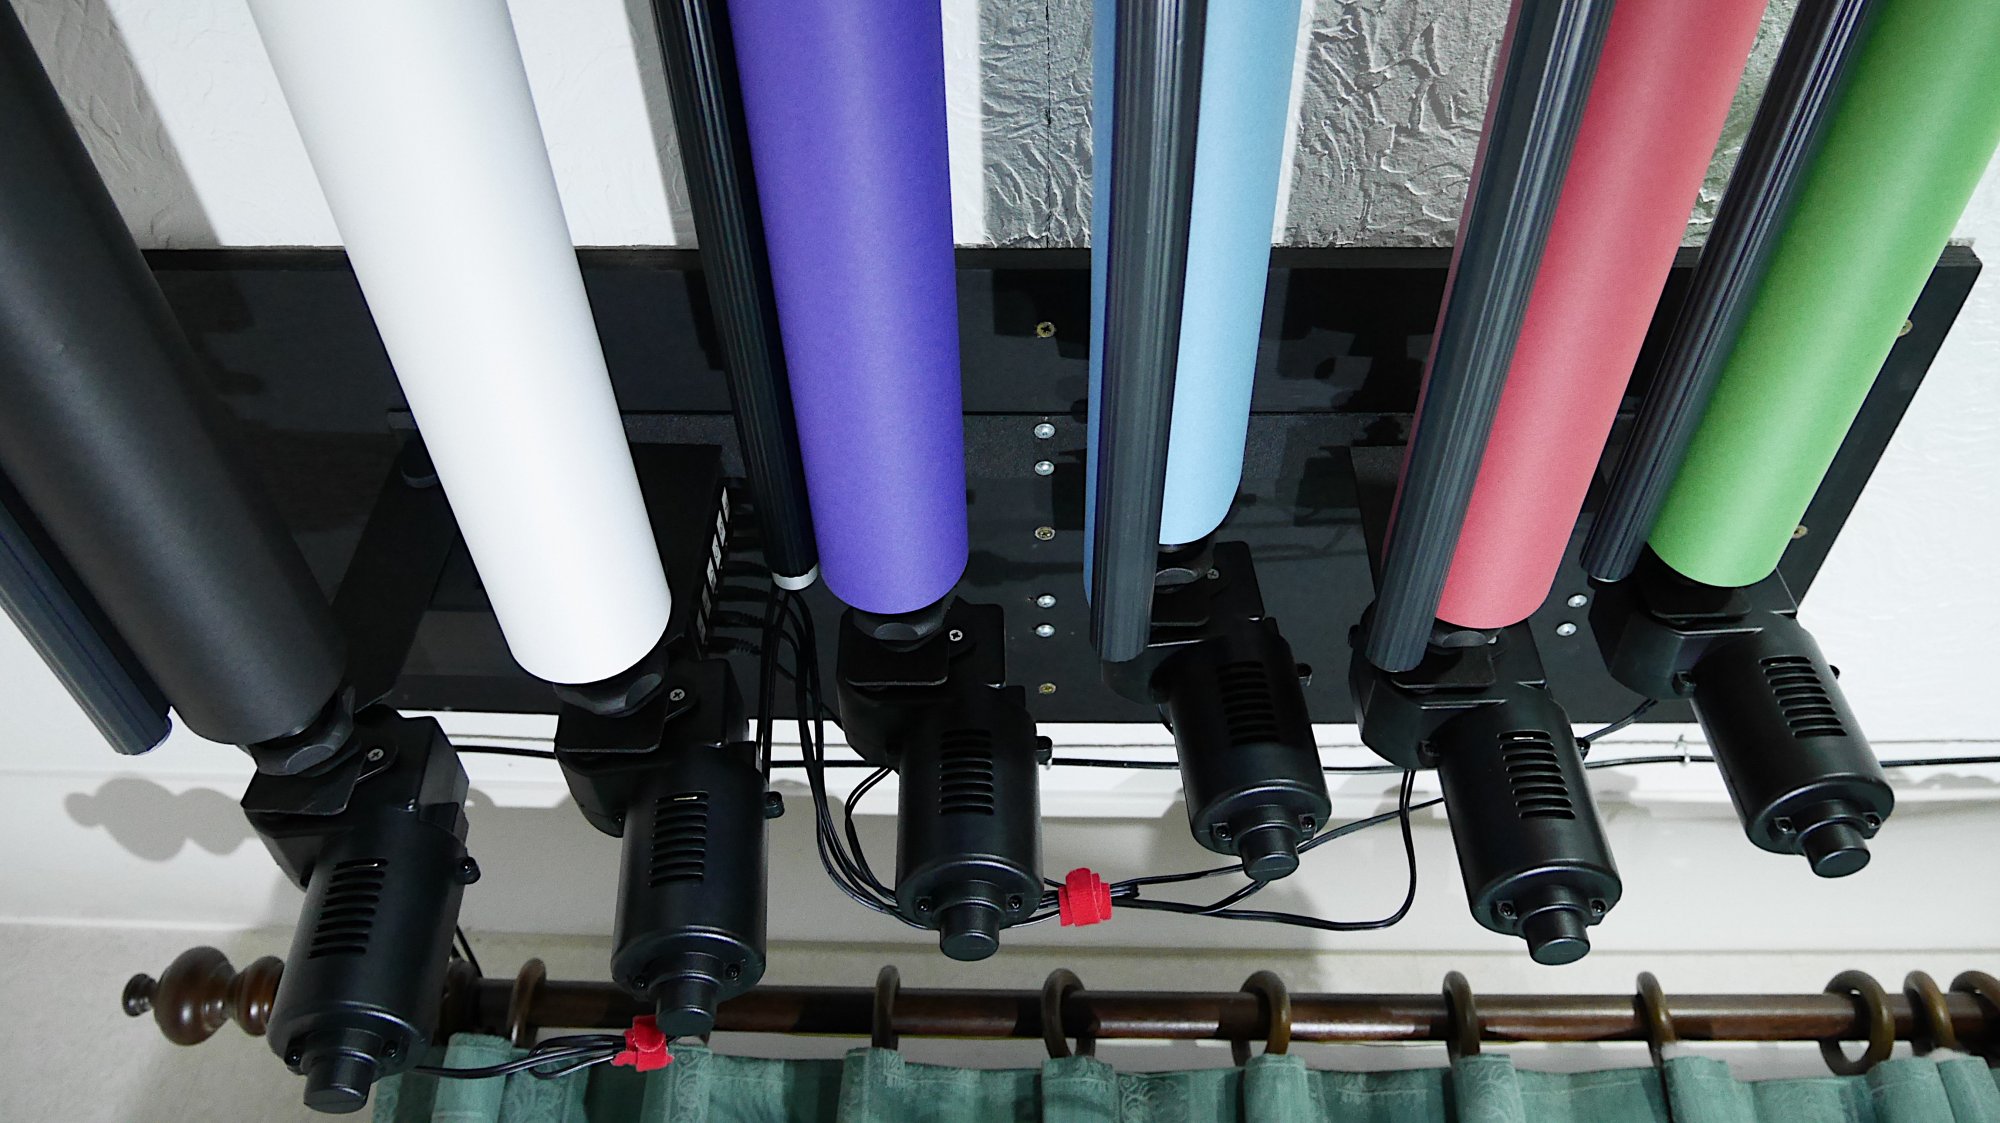
- Six-way, radio-controlled, ceiling mounted, motorised backdrop system, bolted to the ceiling joists, up as high as it will go.
- I have also tried to do it as inexpensively as possible, using mostly generic Chinese kit, modified to suit my needs. I will elaborate on that subject in another article.
Safety first
I was unhappy about using a conventional chain-driven backdrop system. I was concerned that as the room gets used for other purposes, people could get easily become caught up in the dangly chains. So I opted for a an electrically driven system instead. These motorised systems use the same steel hangers and plastic internal roll-clamps that the more popular chain-driven systems use, and they are available in various sizes.
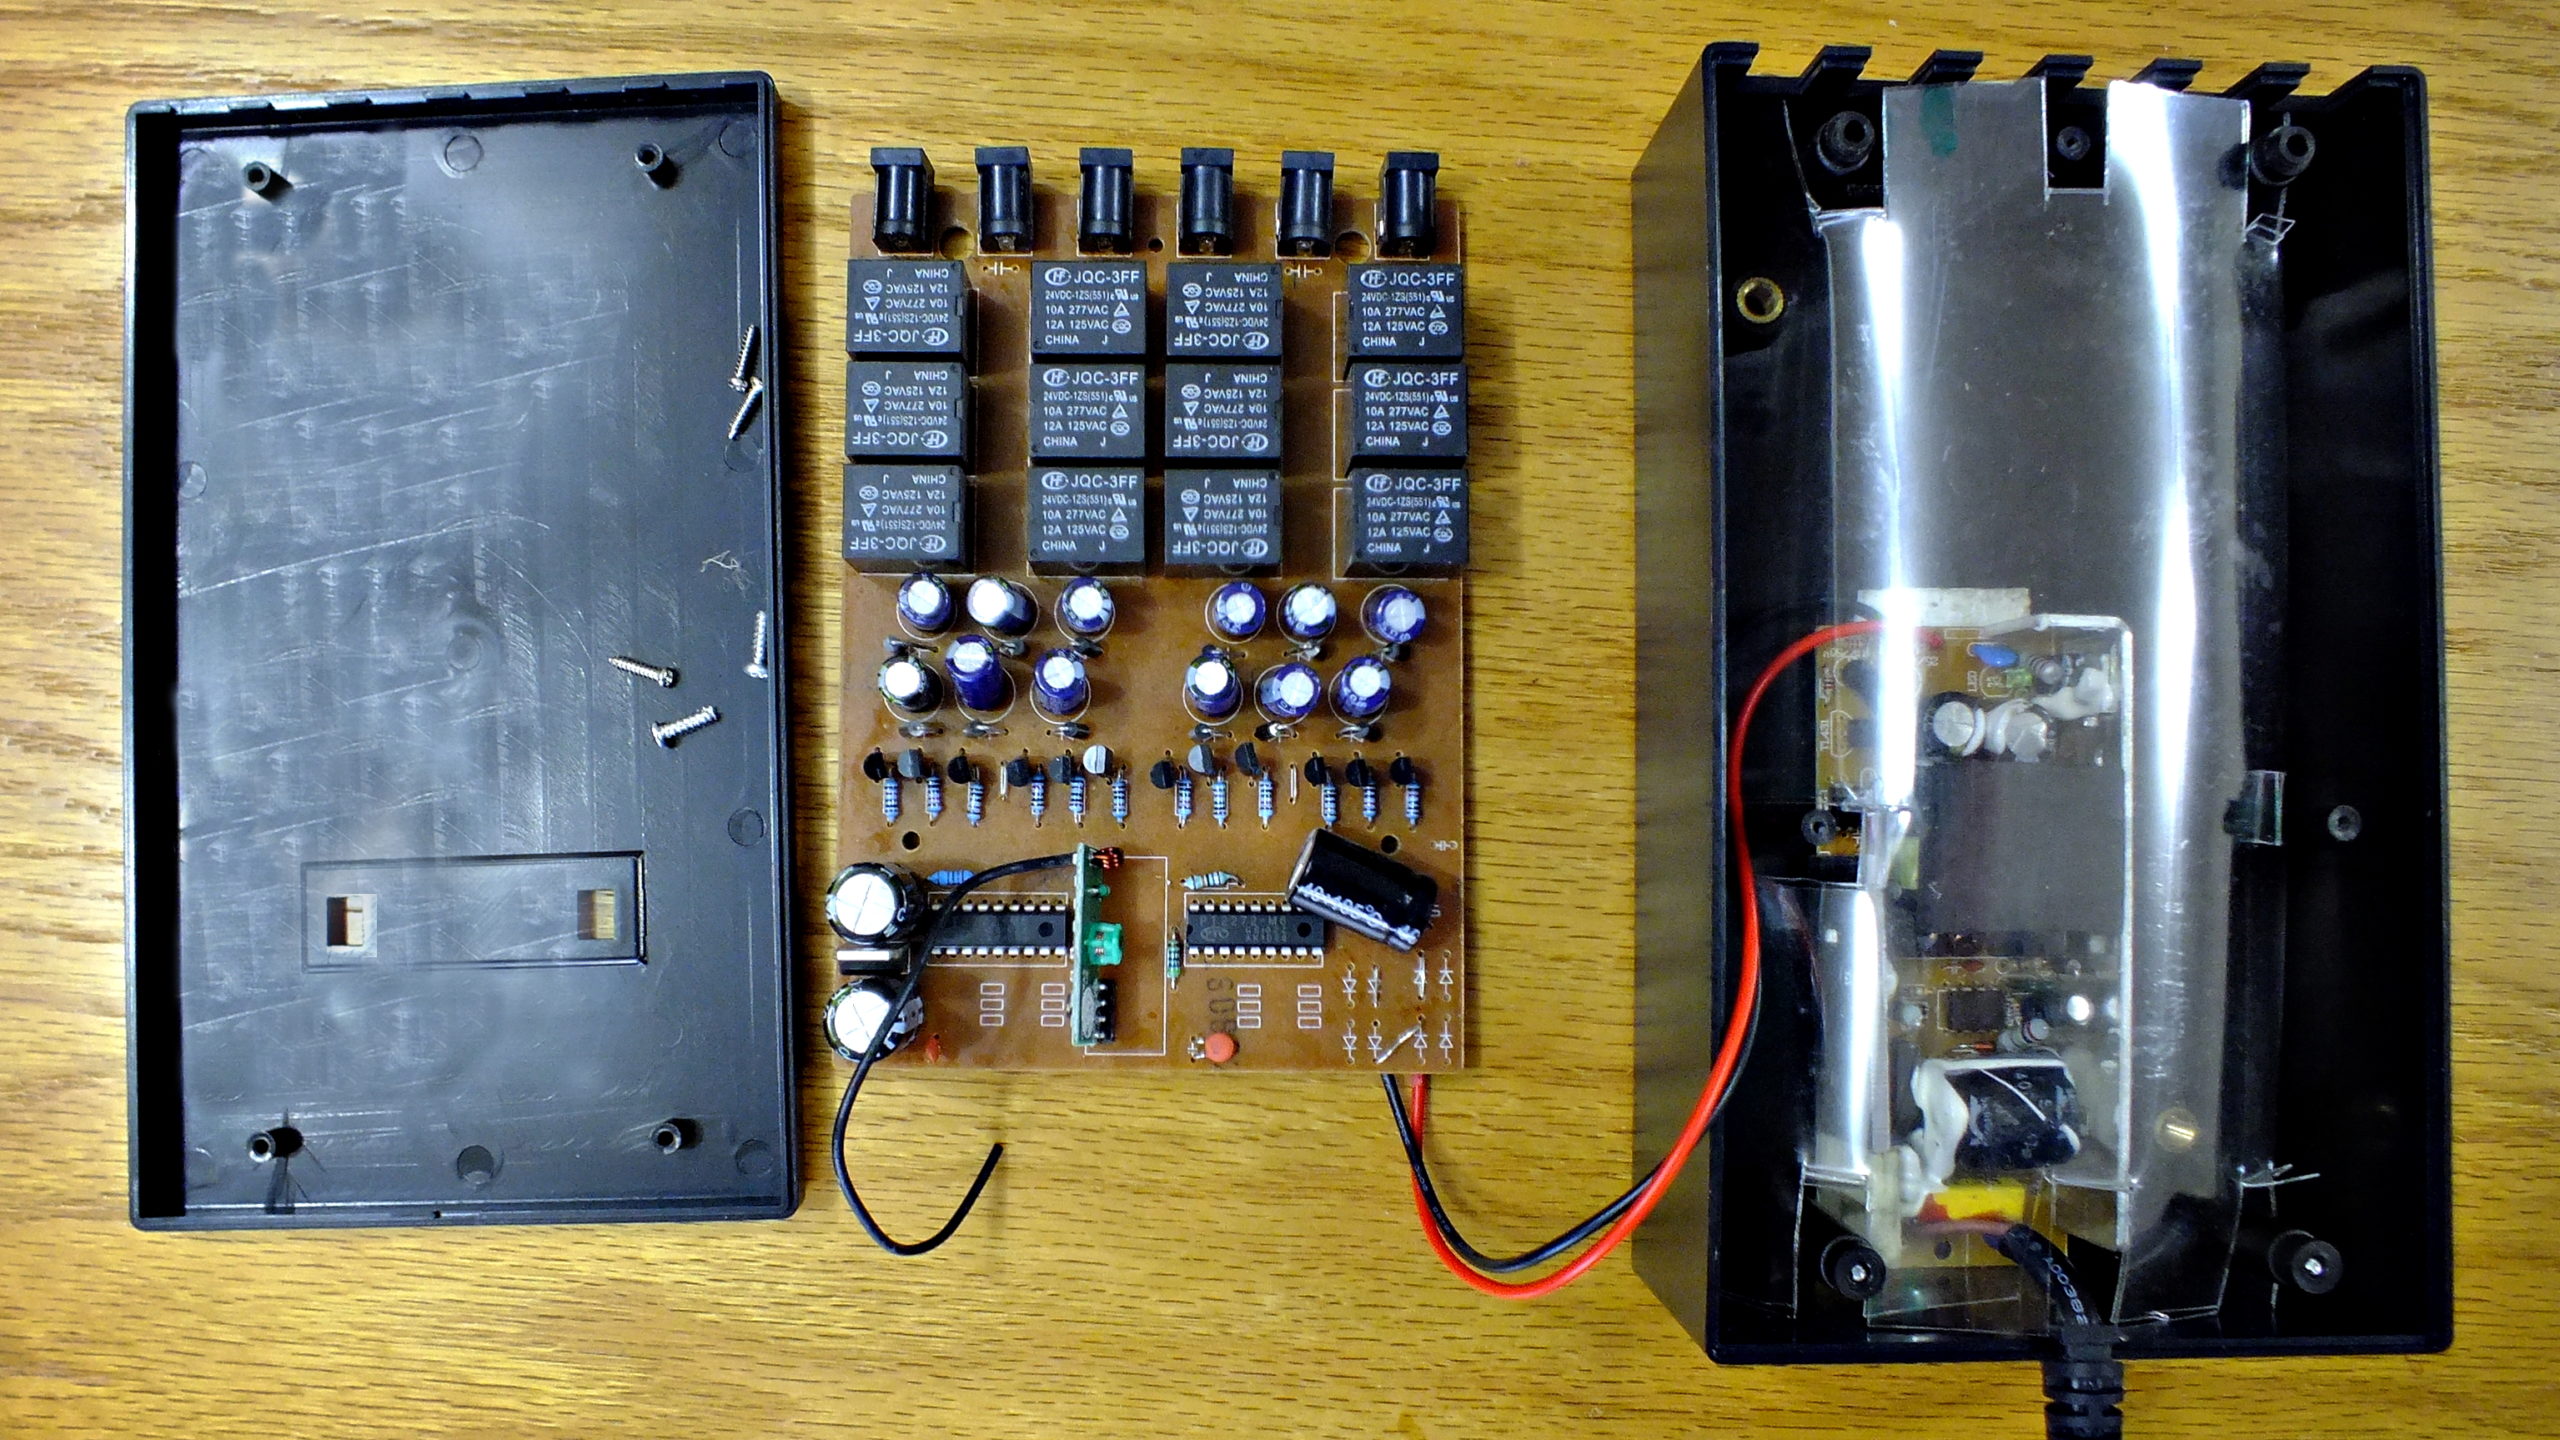
My chosen model accommodates 6 paper rolls and has a 430 MHz wireless remote control system, known as the Nanguan NG-6RE. I paid a bit over 200 quid to a bloke in Poland, back when the UK was still in the EU. The kit included a complete the 6-way system, c/w hangers, roll-clamps, motor assemblies, handheld remote control, control box and a 230 VAC to 24 VDC switch-mode power supply.
The system eventually arrived. Now I had to install it. First problem, the control box rattled. So I dismantled it, and discovered that the switch-mode power supply board was floating about. So I stick it firmly back in place and added a couple of additional layers of insulation between it and the RF/Relay board.
Hanging from the Ceiling
Next problem was that the metal hangers are designed to fit on a solid wall or ceiling. Most UK homes have ceilings comprising of plasterboard over timber joists. Needless to say, the place where the hangers needed to go did not line up with the joists. Which meant I needed some sort of load spreader. I decided to use 2 off 1000 mm x 400 mm x 18 mm plywood plates, which I sprayed matt black.
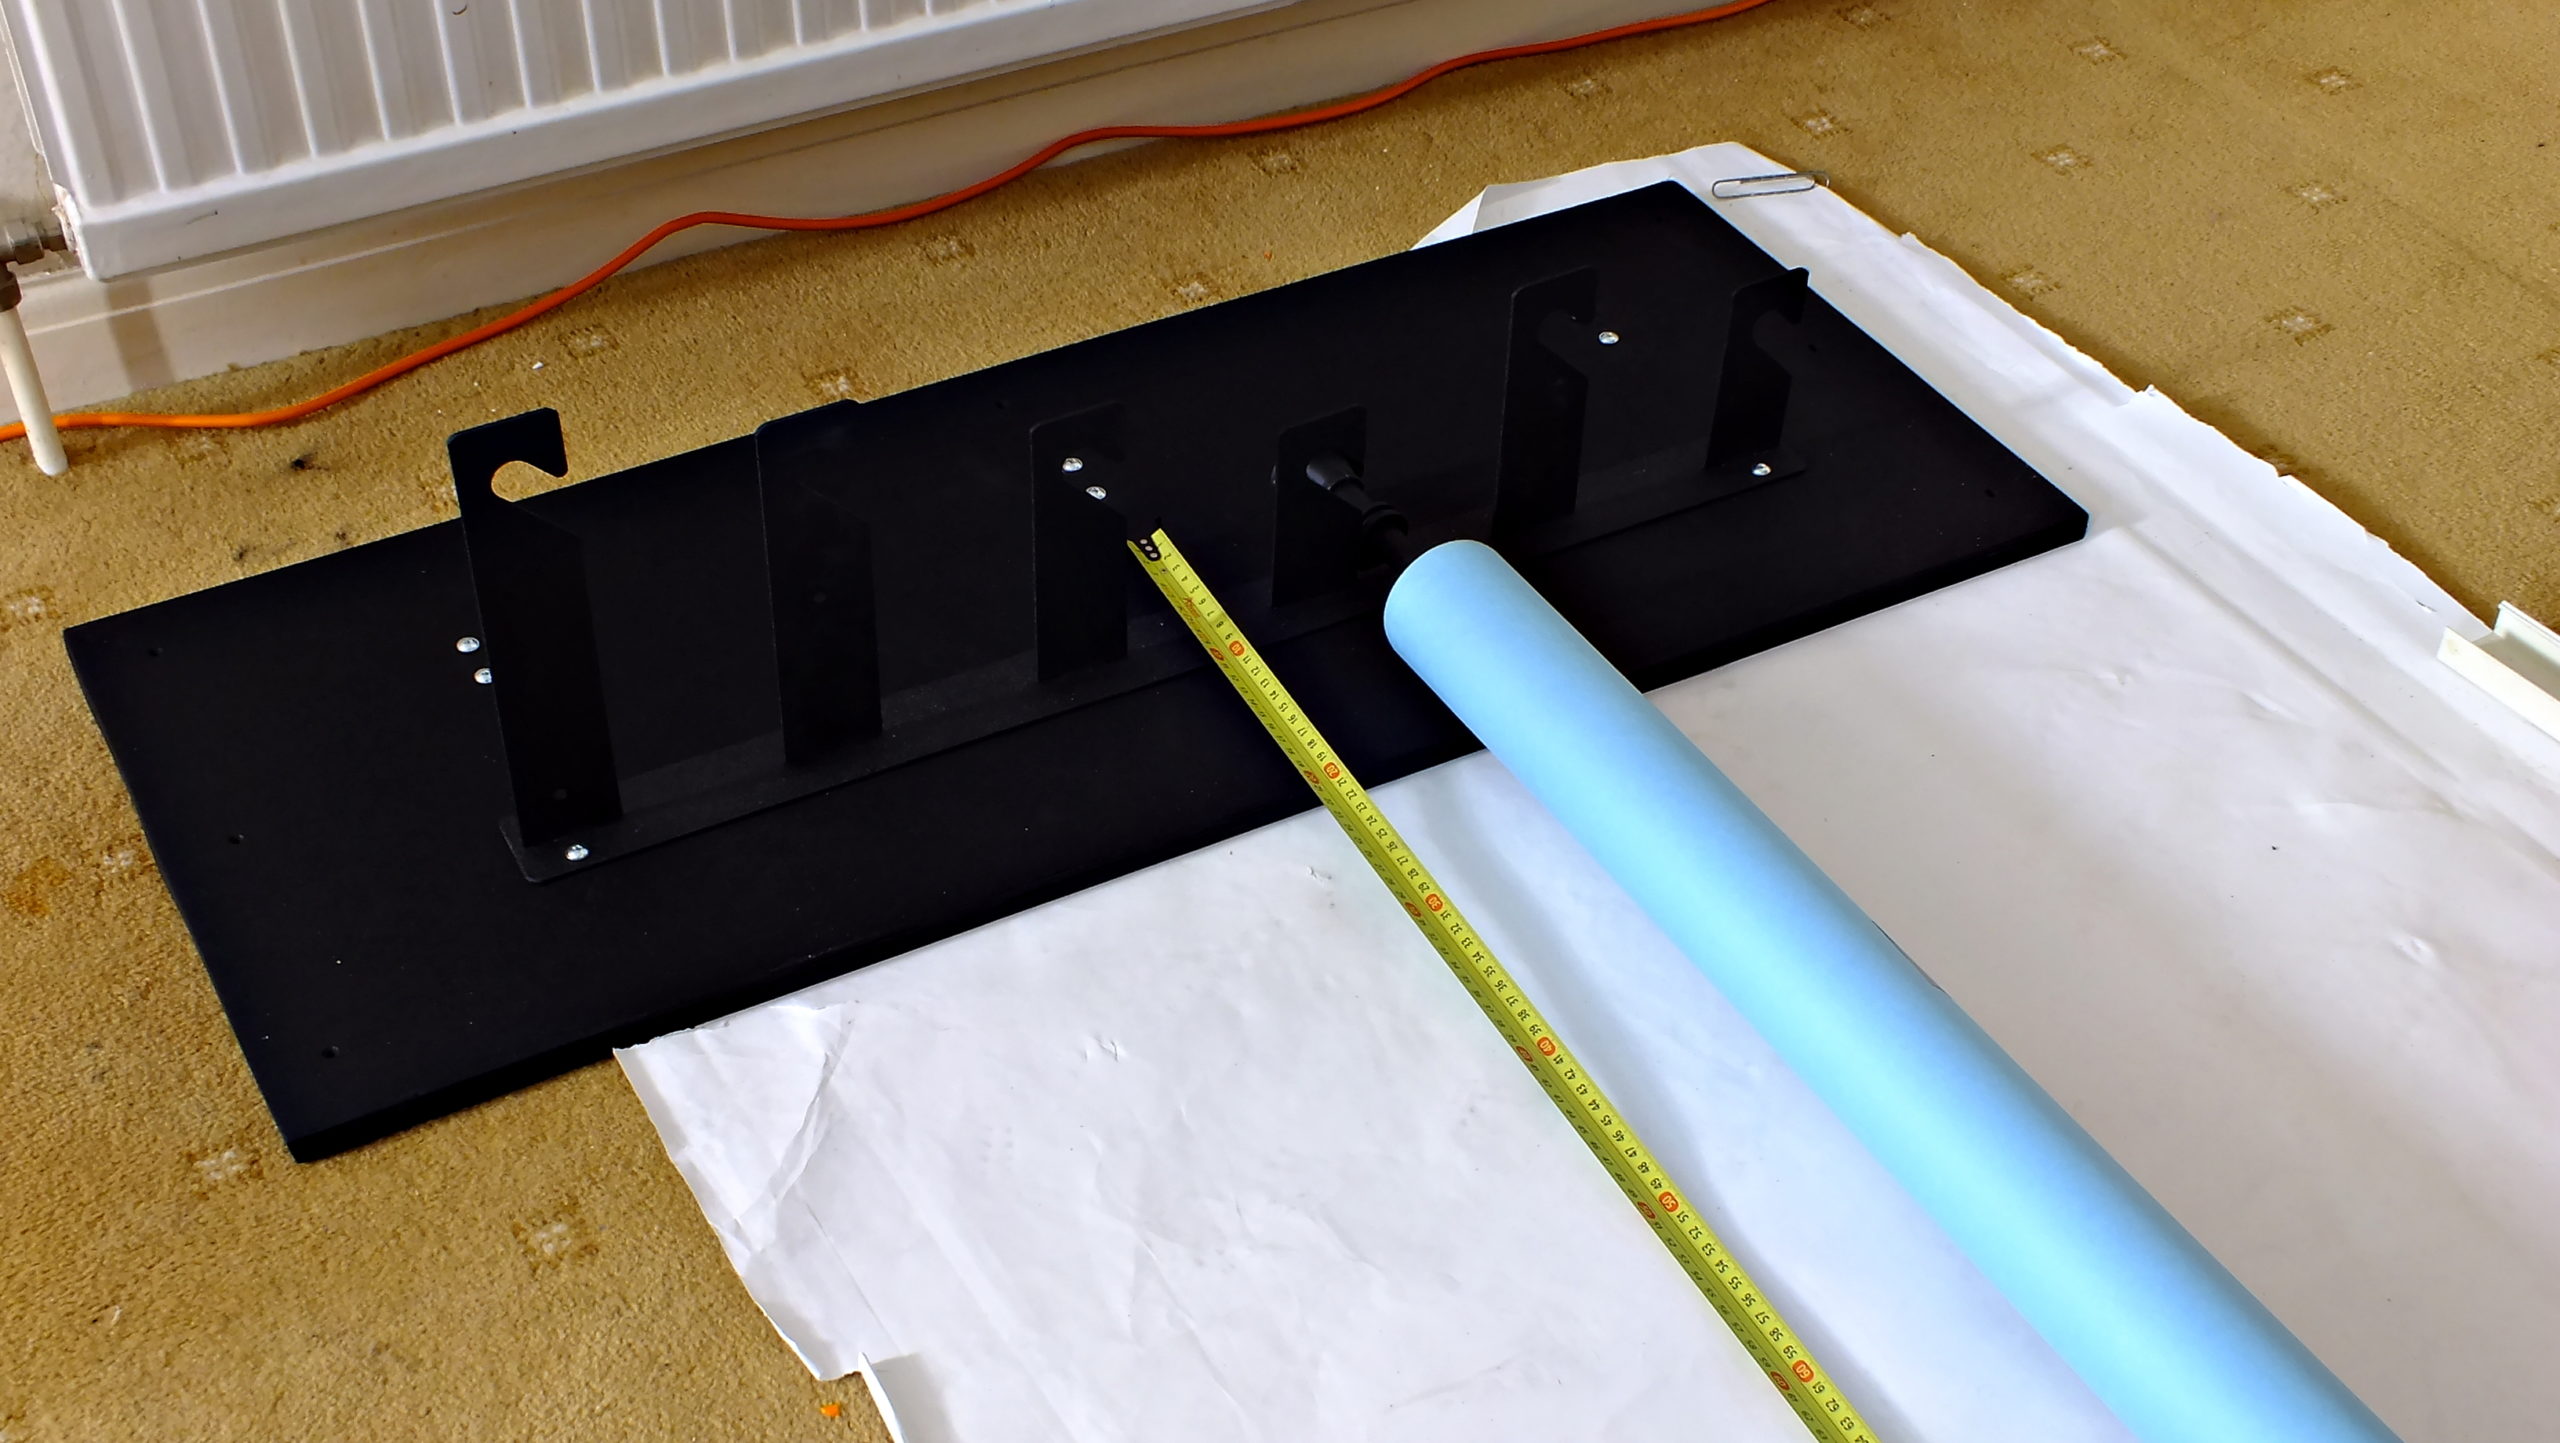

Locating and tracing the ceiling joists. In theory the joists should be at 400 mm centres. However, in this property they are not actually parallel.
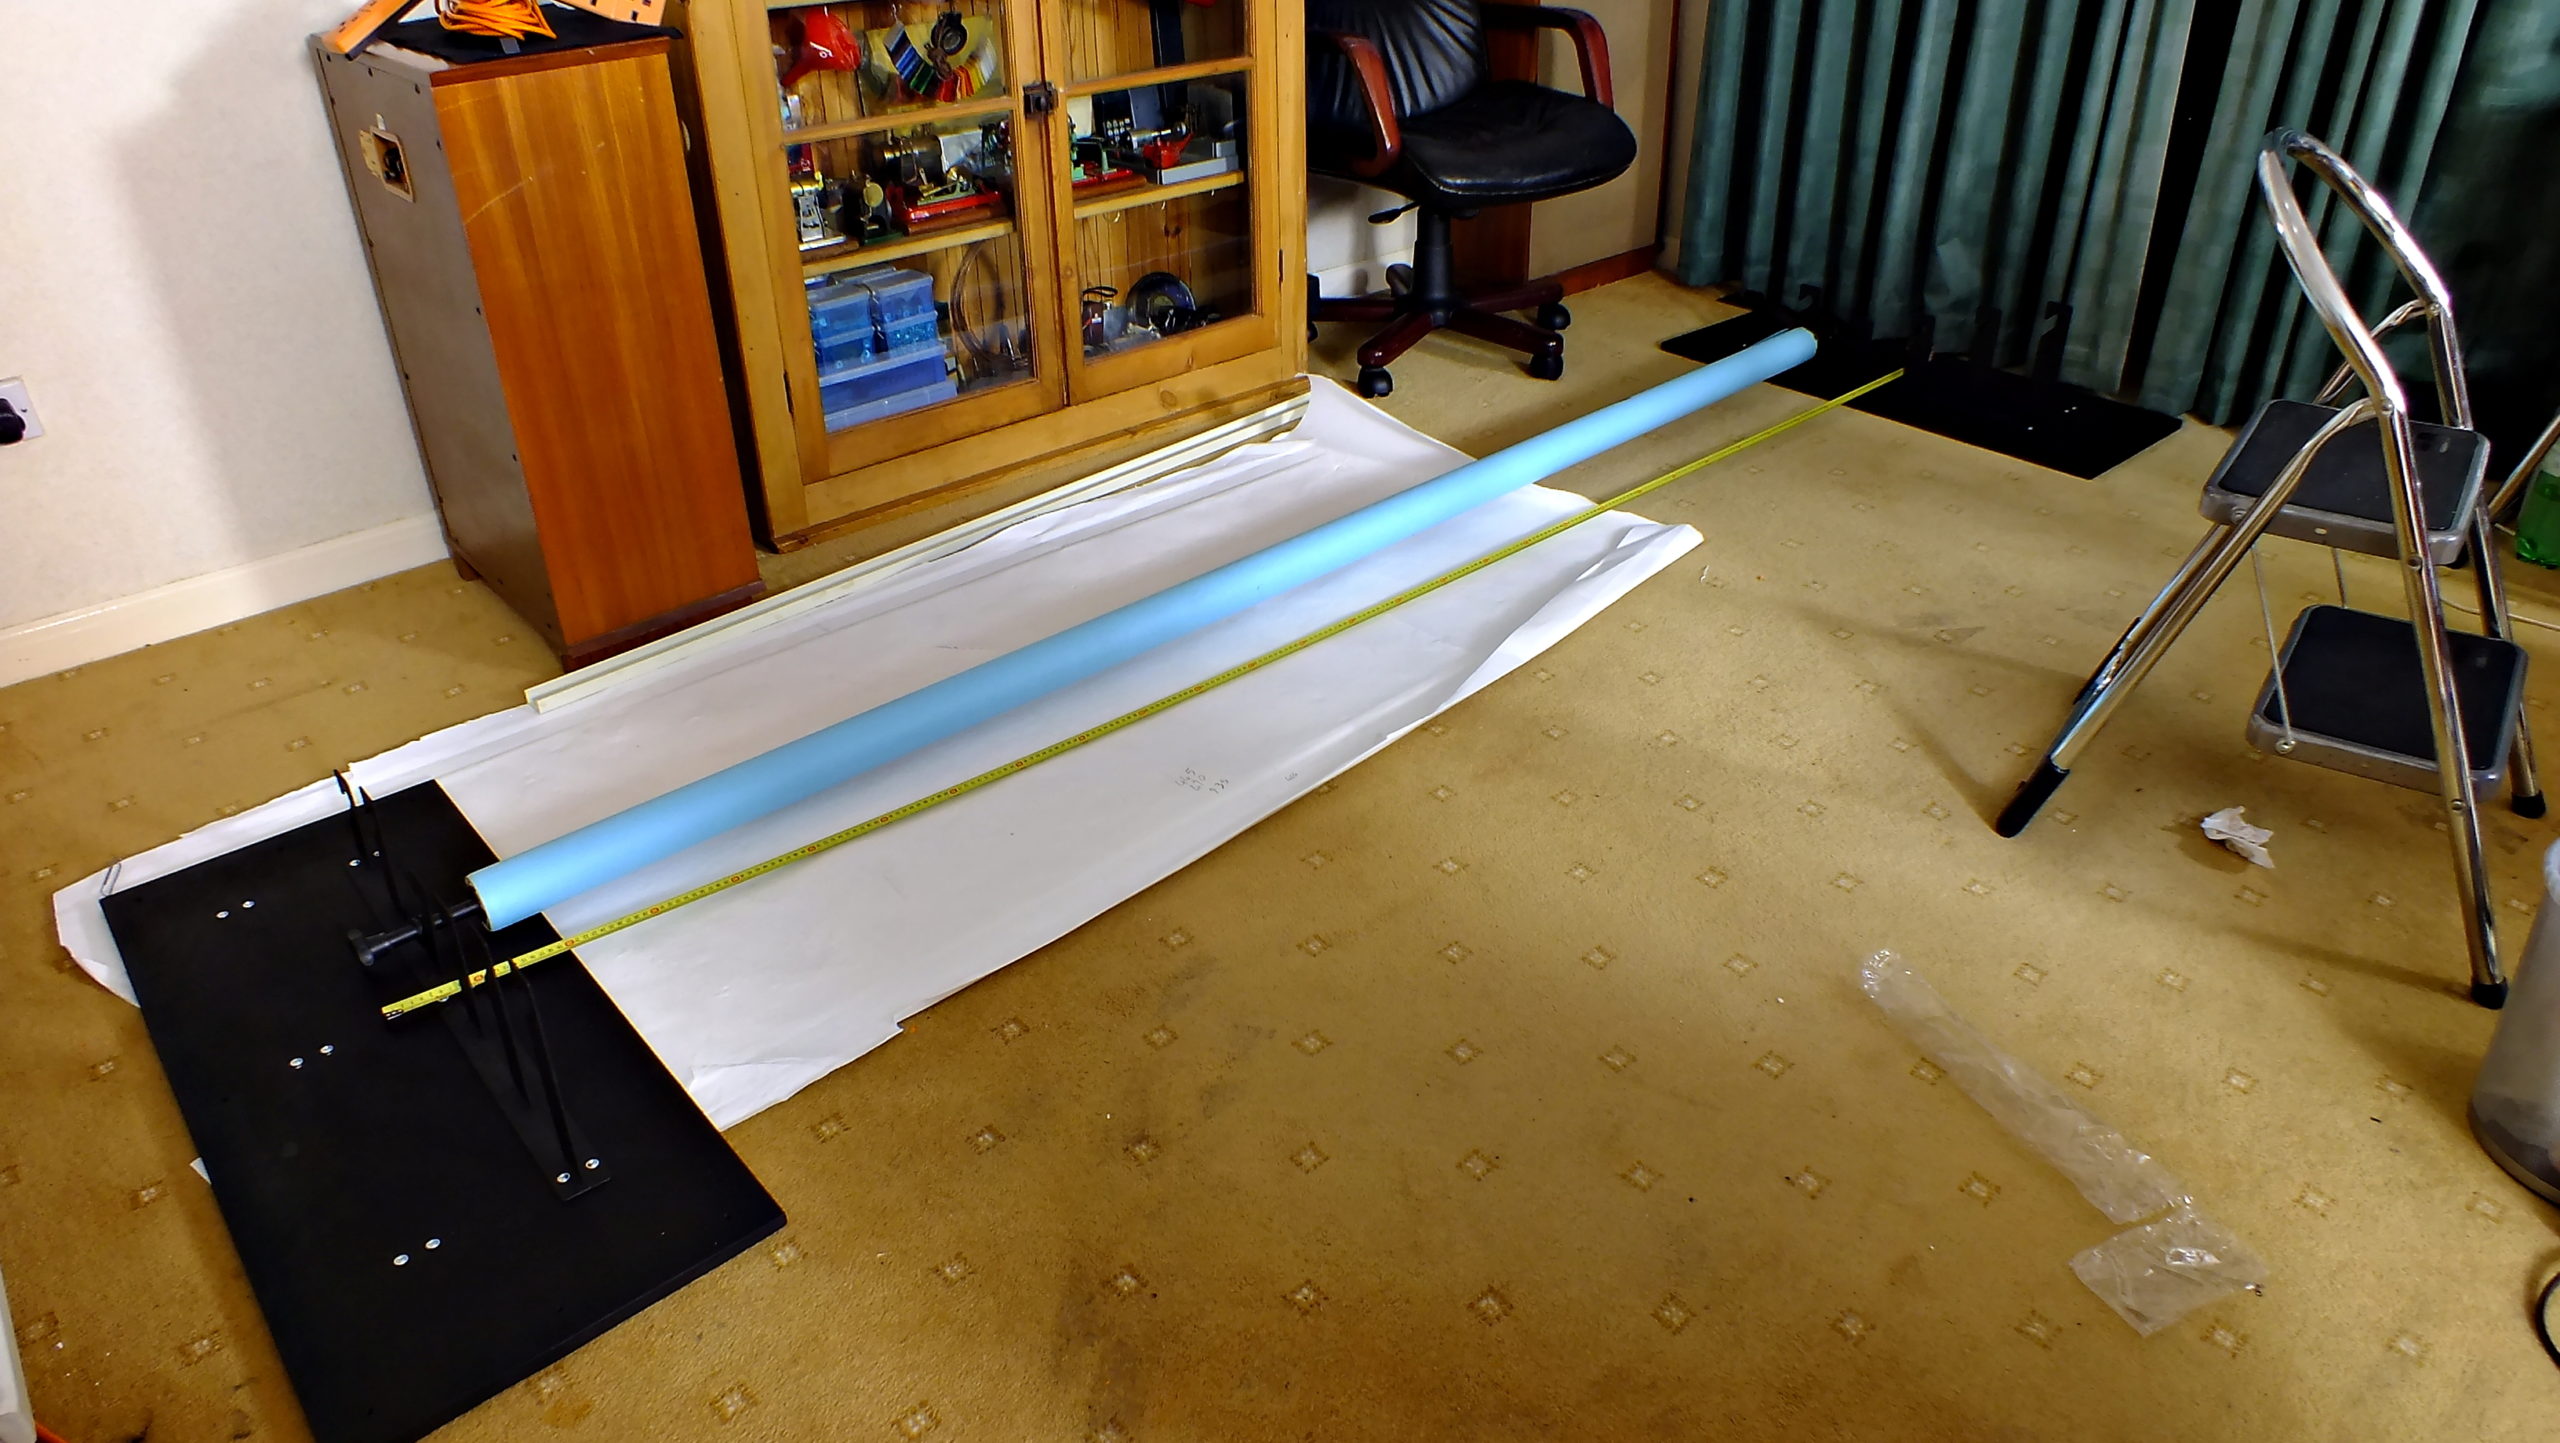
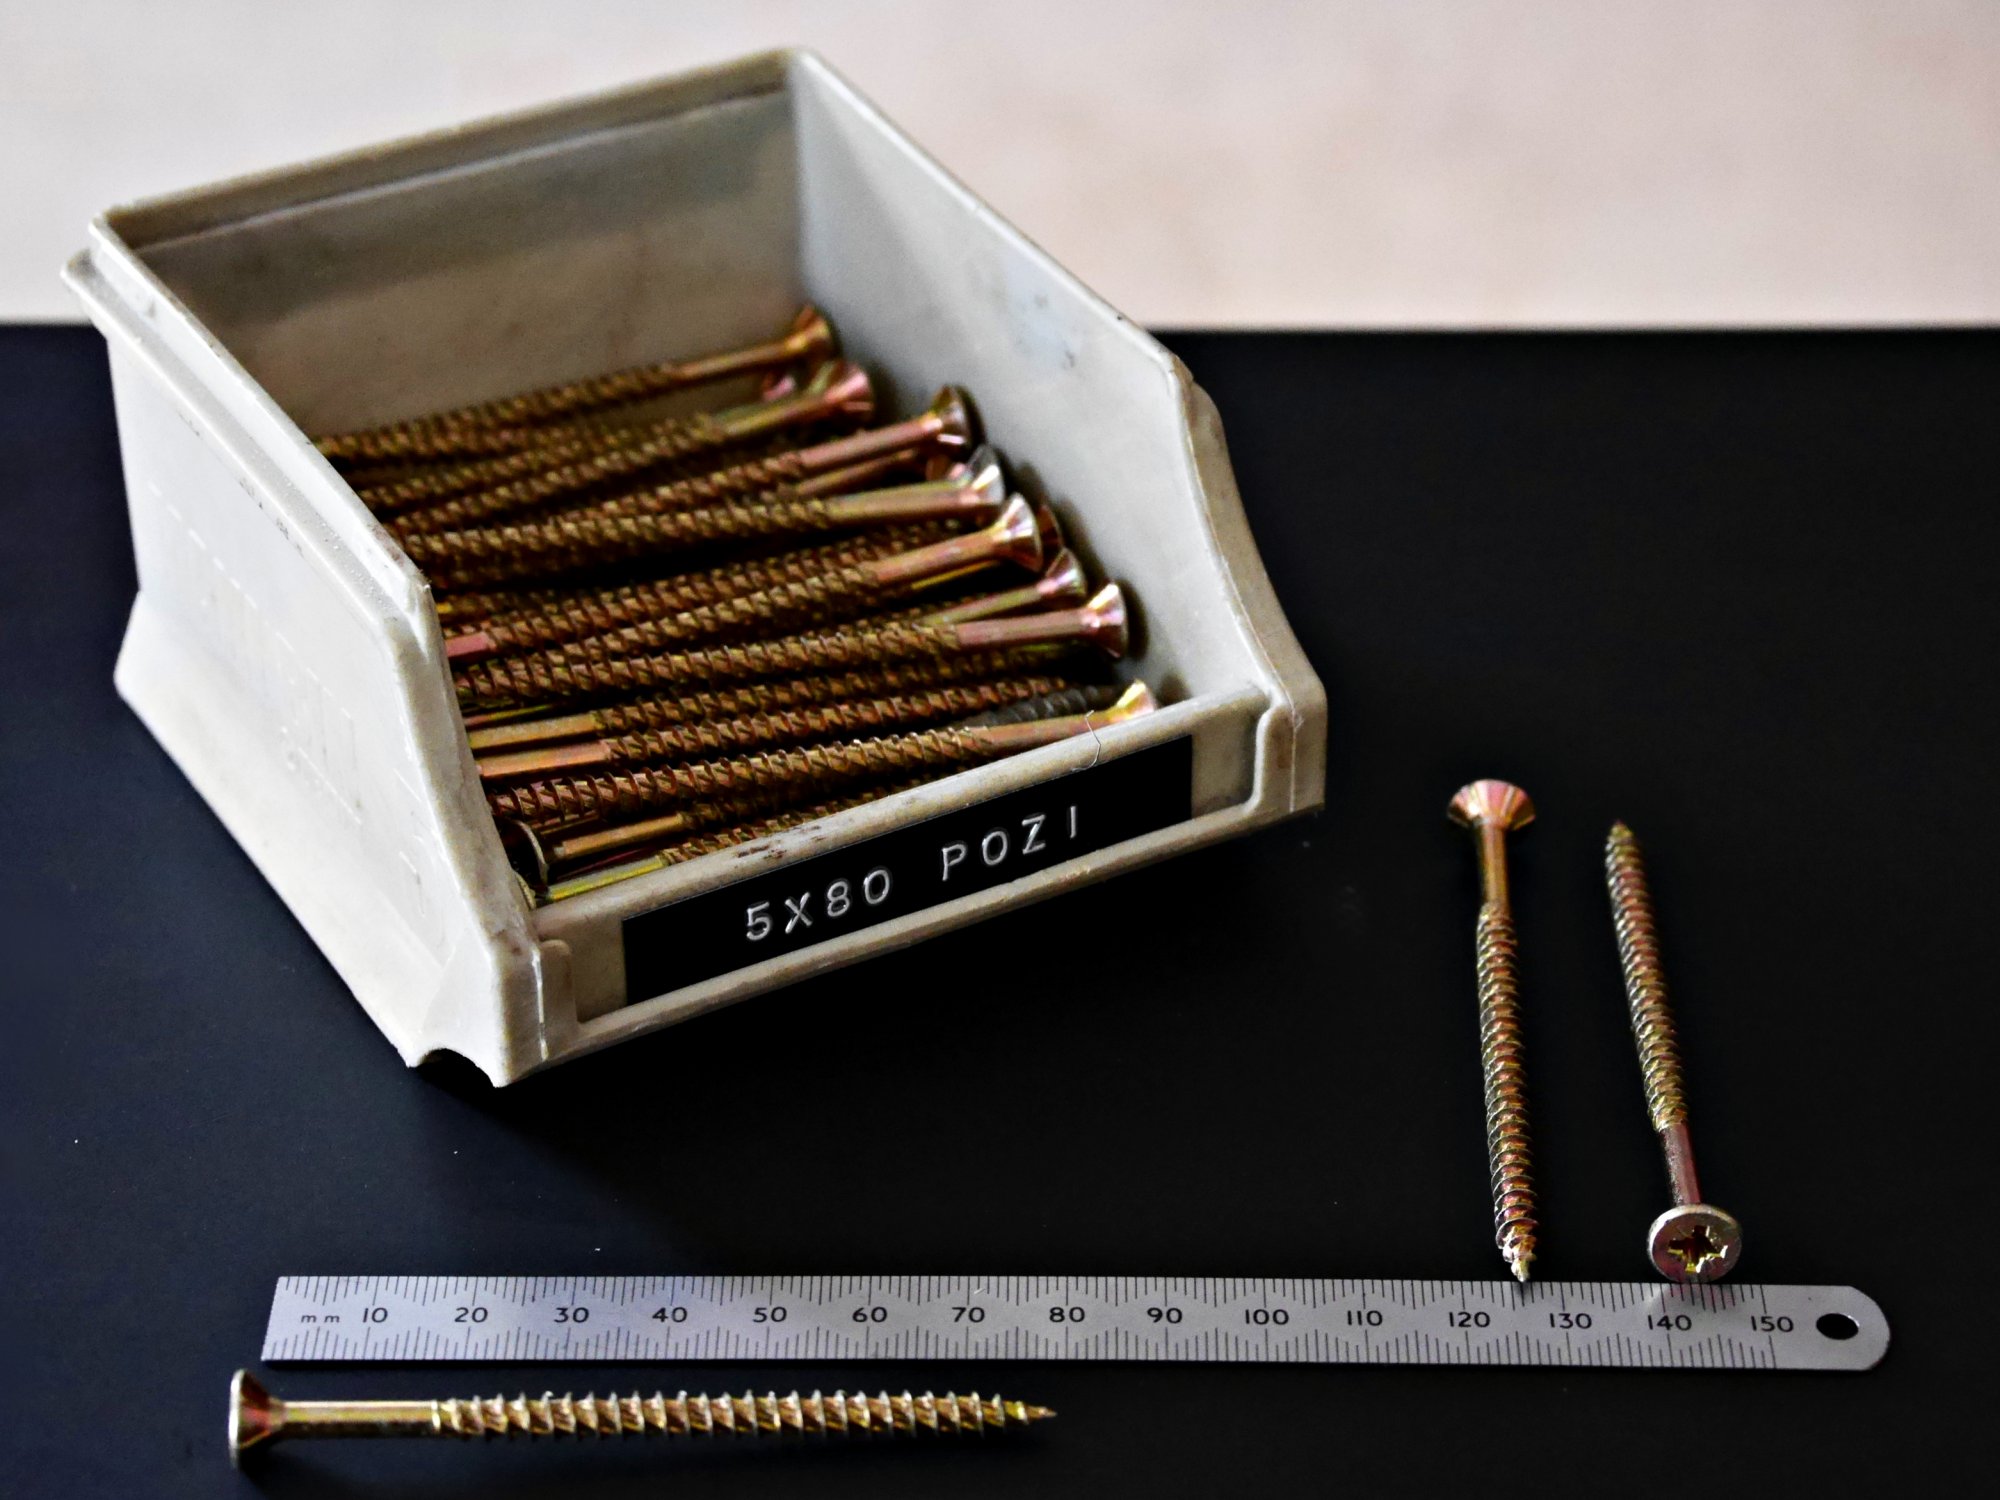
Measuring and calculating the exact distance required between plates in order to accommodate an actual 2.72 metre paper roll.Six full paper roils plus the plywood plates, the hangers, motor/gearbox assemblies and control unit all add up to a significant weight. I estimate around 35 kg. Therefore it is vitally important to ensure that the plywood plates are secured to the ceiling joists properly. Never simply attach the hangers to the plasterboard.
Finding the joists
Having first located the joint centres accurately using a bradawl and a laser level, I used some hardened steel self drilling 80 mm screws. to secure the plywood plates to the ceiling joists. To make life a little simpler, I pre-drilled the plywood plates and fitted the metal hangers to the plywood plates, before finally securing the plates to the ceiling.
The motor drives are interesting. Inside the plastic housing, each motor assembly consists of what appears to be a very solidly-built metal 24 volt truck windscreen-wiper motor. This connects to an equally chunky metal gearbox, that is essentially a worm drive. Which means that when the motor stops, the roll stays put. To ensure the paper rolls up/down nicely and evenly, I splashed-out another £120 on a set of six Manfrotto clip-on paperweights. They weigh just under 1kg each but they are sufficiently heavy to keep the paper taut.
The Manfrotto weights are essentially two 22 mm diameter aluminium tubes, each tube approximately 1.36 m long, that joins in the middle to form a single tube, 2.72 m long. It is used in conjunction with a pair of approximately 1.36 m long circular plastic clip-on covers, that are used to attach the paper to the aluminium tube. Despite their relative simplicity, the big advantage the Manfrotto weights have over the even more expensive types is that they are much safer. No screws sticking out for models to tread on.
Cost
The ceiling mounted power-driven backdrop system was not particularly expensive…
- Motorised system itself, c/w hangers, motors and 430 MHz radio remote control system: £200.00
- Six 2.72 metre x 11 metre paper rolls: £240.00
- Six Manfrotto clip-on paperweights: £120.00
- Miscellaneous stuff, including 5.5 mm x 80 mm case-hardened plated screws, 1 m² plywood, 300 ml matt black spray paint, twenty-four m5 torx bolts and corresponding captive nuts (I originally used 5 mm x 20 mm self-tappers but these are safer), and various other standard DIY bits and bobs too numerous to list here: £100.00
Which means that excluding the cost of my time, the whole kit and caboodle set me back a bit over 650 quid.
- Editor’s note: Of course that was 2014/2015, when Britain was still in the EU, so costs may have increased somewhat since then.
Immediate benefits
Granted, the motorised system was a bugger to fit – working overhead, finding the ceiling joists etc. But it’s eliminated almost all my backdrop issues all in one fell-swoop. Paper rolls last much longer too because the rolling-up/down does not induce any additional damage. It’s also virtually eliminated storage problems too because at the end of a shoot, they all simply roll-up, right out of the way, within 15 cm of the ceiling, all at the click of a button.
Refinements
Since putting the studio together I have added a few refinements:-
- The LED part of my lighting now uses remote control “Mi-Light” LED bulbs/controllers. I can set and control them all with my smartphone, via wi-fi. So the room morphs from from studio, to auditorium, to lounge and back to studio again with a few taps on my phone. Thus my studio space is easily redeployed for other things. This is a design feature which has proven particularly useful during this lock-down.
- A remotely-accessible Raspberry π4 Linux Zoneminder server provides a PTZ security camera for the room (with quite a few more dotted strategically around the building). Same machine also receives data wirelessly from a small sensor-cluster, which monitors the temperature and importantly the relative humidity in the room – which I keep below 60% with the occasional assistance of a Screwfix unbranded dehumidifier. This ensures everything stays fresh and moisture free (especially the insides of my lenses!!!)
- I took the opportunity to tart up the studio a bit during COVID lockdown. Details of which you can find in another article.
In conclusion
I work from home. Consequently, my studio really is a studio, in the old-fashioned sense of the word. Whilst I initially thought of the motorised backdrop system as a bit of a toy, in the five years I have had it, it has proven to be one of my most useful photographic purchases ever. I do much of my most creative thinking late into the night. Therefore, being able to fold everything away at the click of a button and repurpose the space makes a lot of sense for me.
Being a GNU/Linux user also means I have lots of Linux computing power available to me. All my photography is digitally processed with GNU/Linux. and FOSS (free open source software). Our Linux Zoneminder-based security camera system originally set up to protect the studio has acquired uses far beyond anything I initially envisaged. Though on the very rare occasions we go away, anything worth nicking that isn’t bolted down, is removed to another location! 🙂
I’d also add that whilst the space was obtained by selecting a property very carefully, kitting out the studio has been funded entirely by the money I have save by running GNU/Linux and not paying software rental to Adobe, or paying Microsoft for continually upgrading its buggy and intrusive operating systems and office software. Means we don’t have to buy into an antivirus protection racket either. 🙂
Useful links
These might be helpful
- More technical details about the Nanguan NG-6RE Six roller remote control background elevator system…
https://lovefoto.en.alibaba.com/product/60569795970-805348950 - Recent updates to the studio…
https://garfnet.org.uk/cms/2022/05/01/studio-refurbishment/
Disclaimer
- This is how I set up my home studio. It is written with the intention of assisting others in doing the same. It is not intended as a “mine is better than yours” piece and I fully accept that other ways of doing it are available.
- I have tried to configure my studio in a way that is safe and reliable. However it is your responsibility to ensure the safety of your own studio. For example, any electrical work should be undertaken by a qualified electrician.


2 Comments